A Guide to Create a Personal Site
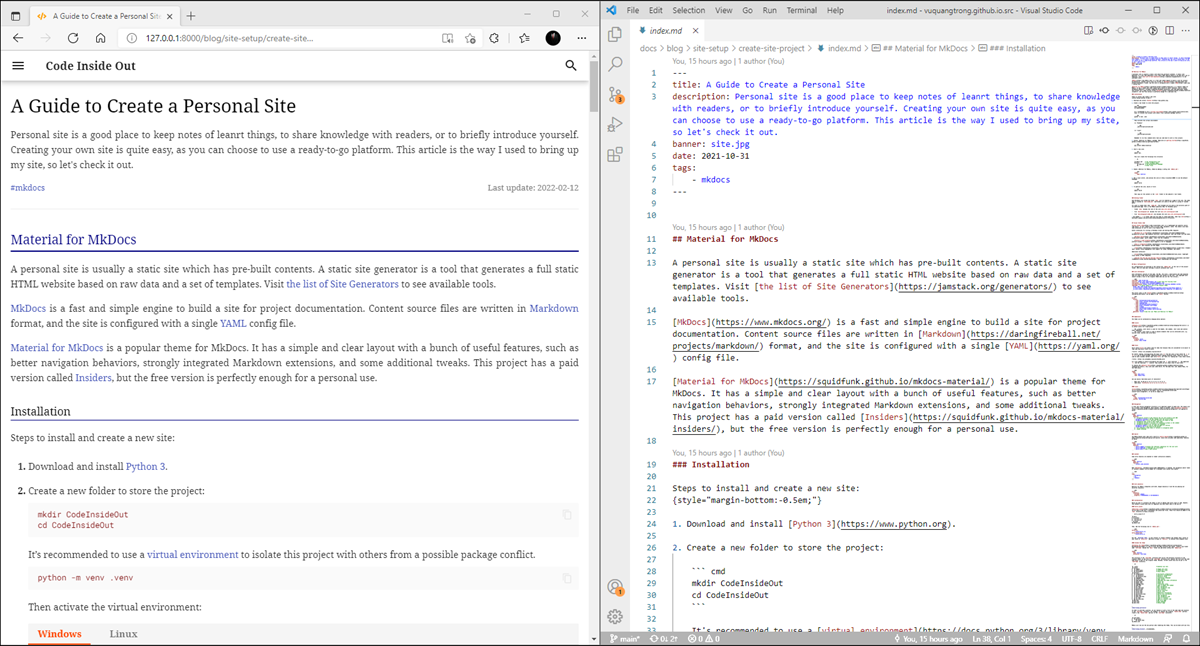
Personal site is a good place to keep notes of leanrt things, to share knowledge with readers, or to briefly introduce yourself. Creating your own site is quite easy, as you can choose to use a ready-to-go platform. This article is the way I used to bring up my site, so let's check it out.
Last update: 2022-06-04
Table of Content
Material for MkDocs#
A personal site is usually a static site which has pre-built contents. A static site generator is a tool that generates a full static HTML website based on raw data and a set of templates. Visit the list of Site Generators to see available tools.
MkDocs is a fast and simple engine to build a site for project documentation. Content source files are written in Markdown format, and the site is configured with a single YAML config file.
Material for MkDocs is a popular theme for MkDocs. It has a simple and clear layout with a bunch of useful features, such as better navigation behaviors, strongly integrated Markdown extensions, and some additional tweaks. This project has a paid version called Insiders, but the free version is perfectly enough for a personal use.
Installation#
Steps to install and create a new site:
-
Download and install Python 3.
-
Create a new folder to store the project:
mkdir CodeInsideOut
cd CodeInsideOut
It’s recommended to use a virtual environment to isolate this project with others from a possible package conflict.
python -m venv .venvThen activate the virtual environment:
.venv\Scripts\activate.bat.venv/Scripts/activateRemember to run this command every time you come back to work in this project.
-
Install Material for MkDocs package. Read more at getting started:
pip install mkdocs-material -
Start a new site:
mkdocs new .This will create the following file structure:
. ├─ mkdocs.yml # The configuration file └─ docs/ # Other markdown pages ├─ index.md # The documentation homepage └─ ... # Other files -
Enable Material for MkDocs theme by adding a config into
mkdocs.yml:theme: name: material -
Run a local server, and preview the site at http://localhost:8000 to see the default homepage:
mkdocs serve -
To publish the site, build it first:
mkdocs buildThen copy all the content in the
sitefolder to the website’s root folder.
Working folder#
Each Markdown file inside the folder docs will be rendered as a page of the site. The index page is located at docs\index.md. Sub-folders are used as the path to a group of related posts.
If a post is named other than index.md, the filename will be used as the directory path of the generated page. Here is how MkDocs generates URLs for Markdown posts:
-
folder
docsbecomes the root of the site www.site.com/ -
file
docs\blog\post.mdbecomes the link www.site.com/blog/post/ -
file
docs\blog\post\index.mdalso becomes the link www.site.com/blog/post/
Use hyphen (
-) in folder name and file name to create good URLs. Some tips here.
Visual Studio Code#
Visual Studio Code is a lightweight but powerful source code editor. It well supports users to write code, documents, notes. This editor also have some extensions to turn it into a full-feature IDE.
Useful extensions for writing in Markdown format and editing HTML template:
-
Markdown All in One: add keyboard shortcuts, auto-completion, edit and format list and table.
-
Markdown Paste: paste images, links from the clipboard.
-
Prettier — Code formatter: a formatter which supports a lot of languages.
-
Draw.io Integration: edit diagrams and SVG images.
-
LTeX: Grammar/spell checker using LanguageTool with support for LaTeX, Markdown, and others.
Additional extensions:
-
Jinja: highlight Jinja syntax in HTML templates.
-
Sublime Text Key map and Settings Importer: import keybindings and settings.
Basic Configuration#
All configurations are declared in the config file mkdocs.yml at the root of the project folder. Here are some main settings to quickly customize your site:
Site Information#
Site information consists of the name, the URL, the title, a description and some keywords that are used to get brief information about the content of the site. The copyright word should include a link to the original theme when you use the free version.
site_name: Code Inside Out
site_url: https://www.codeinsideout.com/ # must have the trailing slash
site_author: Vũ Quang Trọng (vuquangtrong@gmail.com)
site_description: Guides, notes and useful stuff for learning embedded systems.
copyright: > # should remain a link to the original theme
© 2021 Code Inside Out<br>
<a href="https://github.com/vuquangtrong/mkdocs-material-blog">Blog Theme</a> /
<a href="https://squidfunk.github.io/mkdocs-material/">Material for MkDocs</a>
The social links in the footer can be added in the extra section.
extra:
social:
- icon: fontawesome/brands/github-alt
link: https://github.com/vuquangtrong
name: vuquangtrong
- icon: fontawesome/brands/facebook-f
link: https://facebook.com/trongvq
name: trongvq
- icon: fontawesome/brands/linkedin-in
link: https://www.linkedin.com/in/vqtrong
name: vqtrong
generator: false # hide the line "Made with Material for MkDocs"
Appearance#
The theme can be customized by changing below options:
Colors#
Changing color is to select colors for 2 main groups:
- The primary color which is used for the header, the sidebar, text links and several other components.
- The accent color which is used to denote elements that can be interacted with, e.g. hovered links, buttons and scroll-bars.
theme:
palette:
primary: white
accent: deep orange
Fonts#
Serif fonts1 are widely used for body text because they are considered to be easier to read than Sans-Serif fonts in print.
For better reading, distinguishing the digit zero 0 from the Latin script letter Oh o or O is a way to avoid mistake, especially while reading technical notes. Fonts for source code do have slashed/ dotted/ open zero2, but fonts for reading don’t have those styles.
It’s also needed to clearly distinguish the digit one 1 with lowercase i, the uppercase I, and the lowercase l. Luckily, they usually do not stand close to each other.
To replace the defaults fonts, this site uses Noto Serif for the body text, and Roboto Mono for the code block.
theme:
font:
text: Noto Serif
code: Roboto Mono
Can you easily read below pairs of characters?
- Body text: 0o 0O oO 1i 1I 1l 1L iI il iL Il IL lL
- Code block:
0o 0O oO 1i 1I 1l 1L iI il iL Il IL lL
Icons#
Icons can be selected in built-in icon packs, such as . It can be an image also.
theme:
icon:
logo: fontawesome/solid/code
favicon: favicon.png
Navigation#
A clear and concise navigation structure is an important aspect of good site. The layout will be 3 columns: Site Navigation, Main Content, Table of Content. Some navigation features are applied as below:
theme:
    name: material
features:
# - navigation.instant # some features may not work properly with XHR
- navigation.tracking # the URL changes with the active anchor
- navigation.tabs # first top-level sections are shown as tabs
# - navigation.tabs.sticky # tabs always show
# - navigation.sections # sections are rendered as groups in the sidebar
# - navigation.expand # all sections are expanded
- navigation.indexes # link an index.md page to a section
- navigation.top # show back-to-top button
# - toc.integrate # show table of contents to navigation panel
# - header.autohide
Search#
The MkDocs-based sites come with a built-in search engine, which also provides some additional features as below:
theme:
  name: material
  features:
    - search.suggest # display the likeliest completion for the last word
    - search.highlight # highlight all occurrences
    - search.share # show a share button
Content#
Some extra features are enabled to render interactive elements.
theme:
  name: material
  features:
    - content.code.annotate
When Metadata is enabled, the navigation and/or table of contents sidebars can be hidden for a document with custom front matter.
---
hide:
  - navigation
  - toc
  - feedback
---
Site analytics#
Material for MkDocs integrates with both, Google Analytics 4 and the now phasing out Universal Analytics.
extra:
  analytics:
    provider: google
    property: G-XXXXXXXXXX or UA-XXXXXXXX-X
Customization#
Below are ways to customize the theme in terms of adding some extra lines of code. However, this method is quite easy even for beginners who have known some of CSS and JS.
Extra assets#
Additional assets can be used to add user’s stylesheets and JavaScript files. Those file should be added to the docs directory as below structure:
.
├─ docs/
│ ├─ assets/
│ | └─ extra.css
│ | └─ extra.js
| └─ blog/
└─ mkdocs.yml
Then, add the following line to mkdocs.yml:
extra_css:
    - assets/extra.css
extra_javascript:
    - assets/extra.js
Use the Developer mode in your browser to inspect elements and changes their styles as your taste in extra.css. Add extra scripts to extra.js to interact with elements also.
Extend the theme#
Extending the theme is a way to alter the HTML structure and layout. Create a new folder name overrides beside the docs folder and add below config into mkdocs.yml:
theme:
  name: material
  custom_dir: overrides
The structure in the overrides directory must mirror the directory structure of the original theme, as any file in the overrides directory will replace the file with the same name which is part of the original theme. Besides, further assets may also be put in the overrides directory:
.
├─ .icons/                             # Bundled icon sets
├─ assets/
│  ├─ images/                          # Images and icons
│  ├─ javascripts/                     # JavaScript files
│  └─ stylesheets/                     # Style sheets
├─ partials/
│  ├─ integrations/                    # Third-party integrations
│  │  ├─ analytics/                    # Analytics integrations
│  │  └─ analytics.html                # Analytics setup
│  ├─ languages/                       # Translation languages
│  ├─ content.html                     # Page content
│  ├─ copyright.html                   # Copyright and theme information
│  ├─ footer.html                      # Footer bar
│  ├─ header.html                      # Header bar
│  ├─ language.html                    # Translation setup
│  ├─ logo.html                        # Logo in header and sidebar
│  ├─ nav.html                         # Main navigation
│  ├─ nav-item.html                    # Main navigation item
│  ├─ palette.html                     # Color palette
│  ├─ search.html                      # Search interface
│  ├─ social.html                      # Social links
│  ├─ source.html                      # Repository information
│  ├─ source-file.html                 # Source file information
│  ├─ tabs.html                        # Tabs navigation
│  ├─ tabs-item.html                   # Tabs navigation item
│  ├─ toc.html                         # Table of contents
│  └─ toc-item.html                    # Table of contents item
├─ 404.html                            # 404 error page
├─ base.html                           # Base template
└─ main.html                           # Default page
Overriding partials
In order to override a partial, we can replace it with a file of the same name and location in the overrides directory. For example, to replace the original footer.html partial, create a new footer.html partial in the overrides directory:
.
├─ overrides/
│  └─ partials/
│     └─ footer.html
└─ mkdocs.yml
MkDocs will now use the new partial when rendering the theme. This can be done with any file.
Overriding blocks (recommended)
Besides overriding partials, it’s also possible to override (and extend) template blocks, which are defined inside the templates and wrap specific features. In order to set up block overrides, create a main.html file inside the overrides directory:
.
├─ overrides/
│  └─ main.html
└─ mkdocs.yml
Then, e.g. to override the site title, add the following lines to main.html:
{% extends "base.html" %}

{% block htmltitle %}
    <title>Lorem ipsum dolor sit amet</title>
{% endblock %}
The following template blocks are provided by the theme:
analytics   # Wraps the Google Analytics integration
announce    # Wraps the announcement bar
config      # Wraps the JavaScript application config
content     # Wraps the main content
disqus      # Wraps the Disqus integration
extrahead   # Empty block to add custom meta tags
fonts       # Wraps the font definitions
footer      # Wraps the footer with navigation and copyright
header      # Wraps the fixed header bar
hero        # Wraps the hero teaser (if available)
htmltitle   # Wraps the <title> tag
libs        # Wraps the JavaScript libraries (header)
outdated    # Wraps the version warning
scripts     # Wraps the JavaScript application (footer)
site_meta   # Wraps the meta tags in the document head
site_nav    # Wraps the site navigation and table of contents
styles      # Wraps the style sheets (also extra sources)
tabs        # Wraps the tabs navigation (if available)
Comment system#
Disqus can be easily integrated into theme by overriding the file post-content.html, and adding disqus section. See full guide here.
extra:
  disqus: "vuquangtrong-github-io"
{# edit button #}
{% if page.edit_url %}
    <a href="{{ page.edit_url }}" title="{{ lang.t('edit.link.title') }}" class="md-content__button md-icon">
        {% include ".icons/material/pencil.svg" %}
    </a>
{% endif %}

{% include "partials/post-cover.html" %}

<hr class="screen-only">

{% include "partials/post-toc.html" %}

{# show the children pages if no content #}
{% if page.markdown == '' and page.parent.children %}
    <h2>Posts in this section:</h2>
    <ol>
        {% for obj in page.parent.children %}
            {% if obj.is_section %}
                {% set p = obj.children[0] %}
                <li>
                    <a href="{{ p.canonical_url }}">
                        {%- if p.meta and p.meta.title -%}
                            {{- p.meta.title -}}
                        {%- else -%}
                            {{- p.title -}}
                        {%- endif -%}
                    </a>
                </li>
            {% endif %}
        {% endfor %}
    </ol>
{% else %}
    {# content #}
    {{ page.content }}
{% endif %}

{% if page.markdown == '' and page.parent.children %}
{% else %}
    {# comment #}
    {% include "partials/disqus.html" %}
{% endif %}
<!-- Get setting from mkdocs.yml, but allow page-level overrides -->
{% set disqus = config.extra.disqus %}
{% if page.meta and page.meta.disqus is string %}
    {% set disqus = page.meta.disqus %}
{% endif %}

<!-- Inject Disqus into current page -->
{% if not page.is_homepage and disqus %}
    <h2 id="__comments">{{ lang.t("meta.comments") }}</h2>
    <div id="disqus_thread"></div>
    <script>
        var disqus_config = function () {
            this.page.url = "{{ page.canonical_url }}"
            this.page.identifier =
                "{{ page.canonical_url | replace(config.site_url, '') }}"
        }

        /* Set up for the first time */
        if (typeof DISQUS === "undefined") {
            var script = document.createElement("script")
            script.async = true
            script.src = "https://{{ disqus }}.disqus.com/embed.js"
            script.setAttribute("data-timestamp", Date.now())

            /* Inject script tag */
            document.body.appendChild(script)

        /* Set up on navigation (instant loading) */
        } else {
            DISQUS.reset({
                reload: true,
                config: disqus_config
            })
        }
    </script>
{% endif %}