STM32 VS Code Extension Overview
STMicroelectronics recently published an extension for turning VS Code into a STM32 IDE which combines CMake, ST MCU Finder, STM32CubeMX and STM32CubeCLT and a dozen of extensions.
STM32 Tools
ST-MCU-FINDER explores the full range of STM32 and STM8 microcontrollers, processors, dev boards, and examples.
unzip en.st-mcu-finderlin-v6-1-0.zip./SetupSTMCUFinder-6.1.0STM32CubeMX simplifies the configuration of STM32 microcontrollers and generates the corresponding initialization C code. Starting from v6.11.0, STM32CubeMX can generate VSCode-compatible CMake projects, eliminating the need for .cproject/.project conversion in CubeIDE.
unzip en.stm32cubemx-lin-v6-12-0.zip./SetupSTM32CubeMX-6.12.0STM32CubeCLT is a package containing toolchain and STM32 device related data required for project creation, build, and debug functionality.
sudo ./st-stm32cubeclt_1.16.0_21983_20240628_1741_amd64.shCLT pack includes CMake, Ninja, STLink GDB Server, STM32Cube Programmer, JRE.
Install device rules:
sudo cp /opt/st/stm32cubeclt_1.16.0/STLink-gdb-server/bin/*.rules /etc/udev/rules.d/Restart Udev:
sudo udevadm control --reload-rules && sudo udevadm triggerIt may lack of Ncurses which is a tool that helps programmers create text-based user interfaces that work on different types of computers.
sudo apt install libncursesSTM32 VS Code Extension brings an IDE to work with STM32 projects.
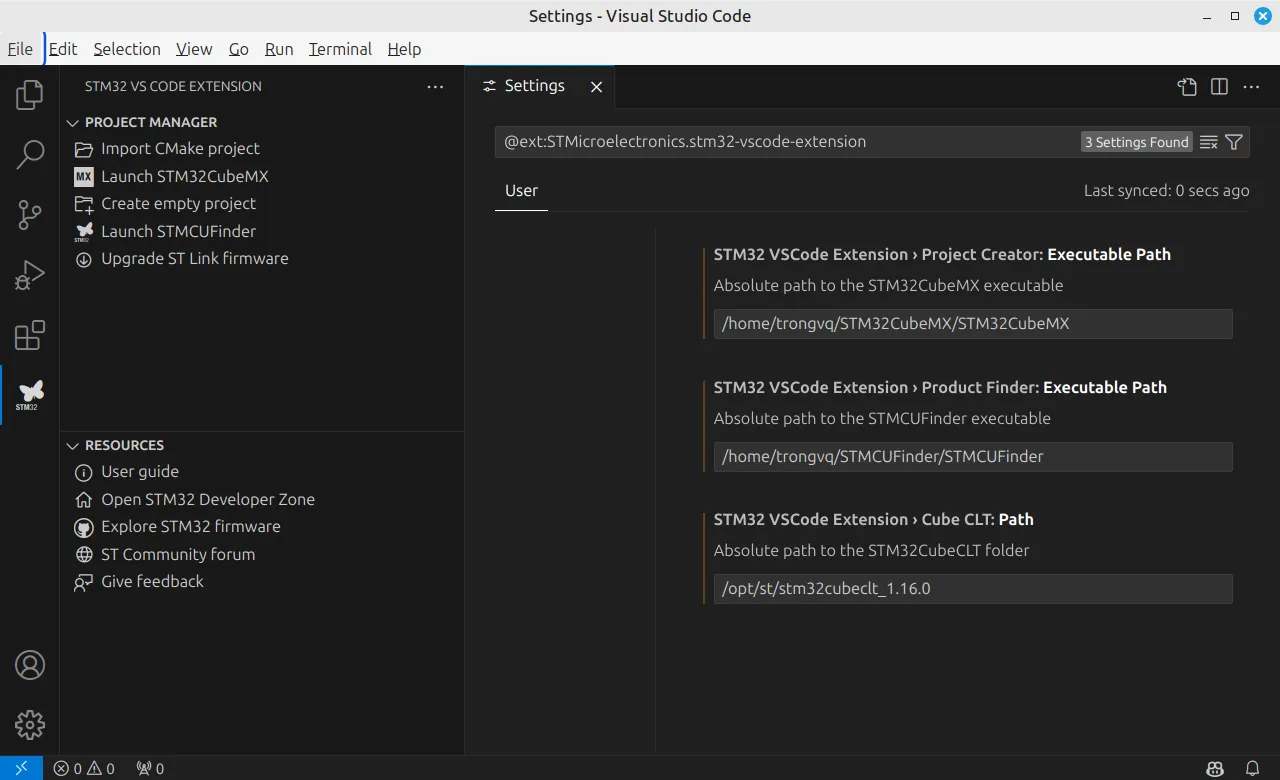
Install this extension, then configure paths for CubeMX, MCUFinder, and CubeCLT.
Generate new Project
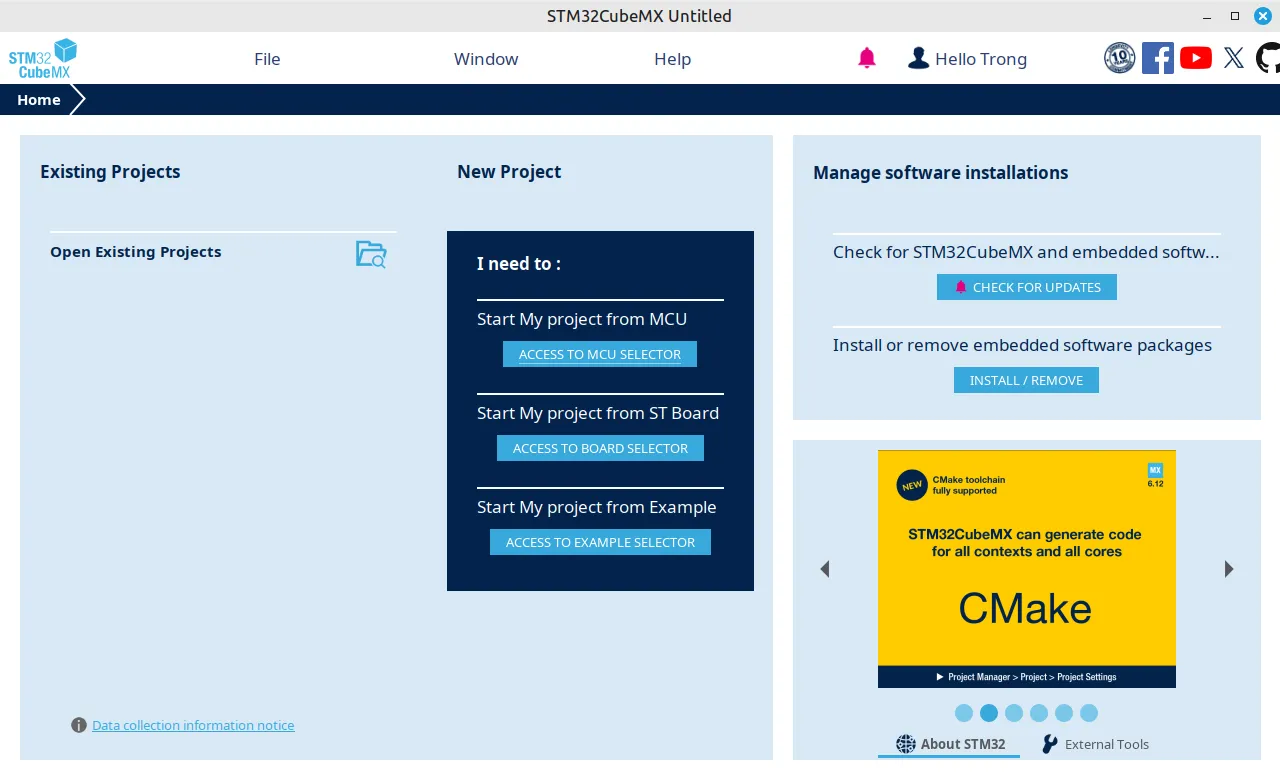
Click on Launch STM32CubeMX to start a new project:
Choose to Start with an MCU or a Board:
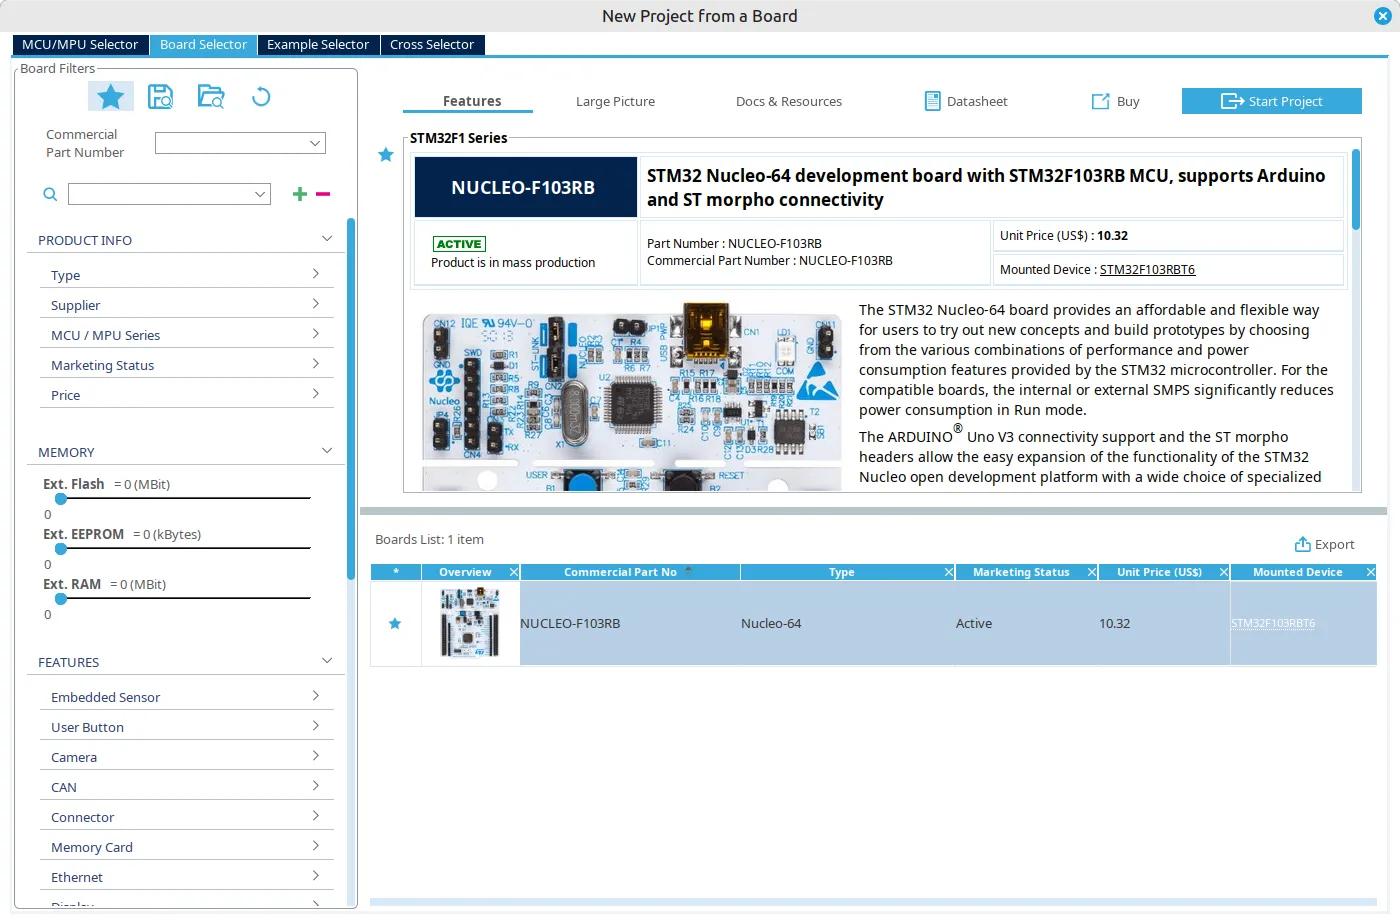
Select a target in ST MCU Finder then click on Start Project:
If a board is selected, prefer to choose to Initialize all peripherals with their default mode which is already configured for the board.
Go through STM32CubeMX configuration:
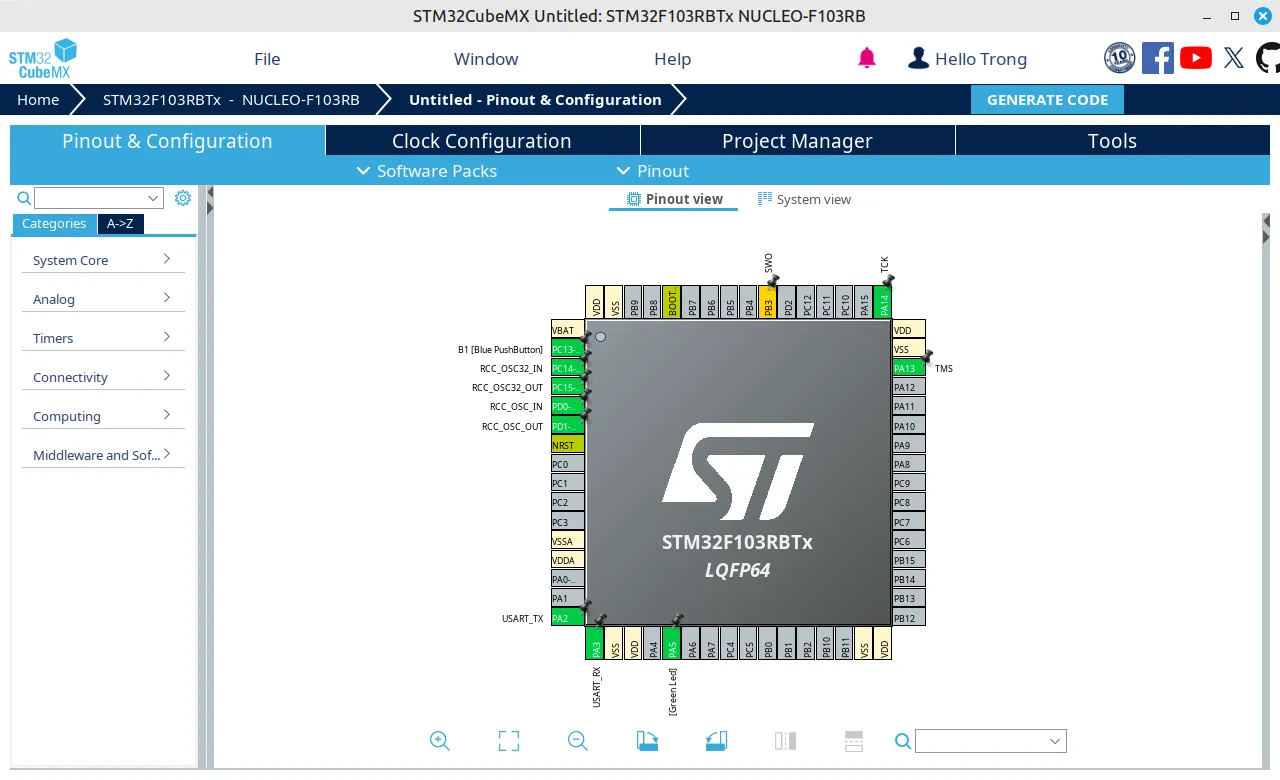
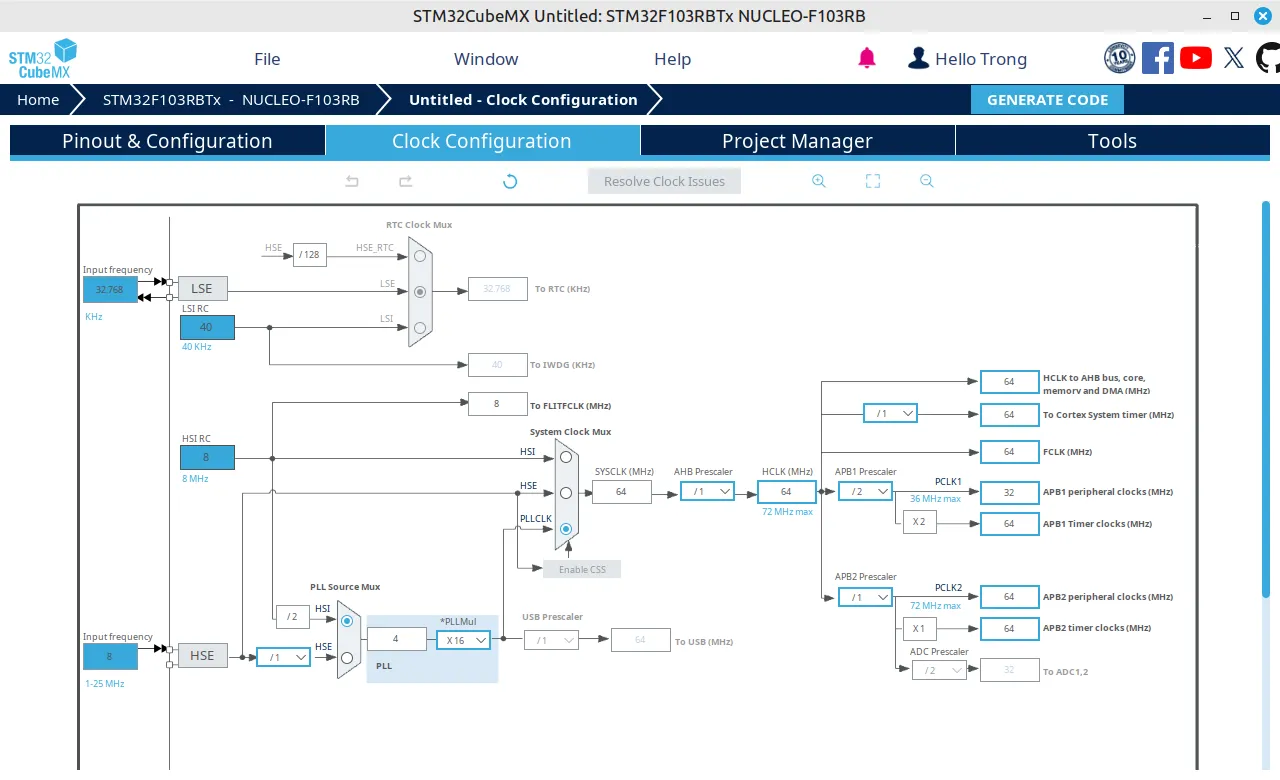
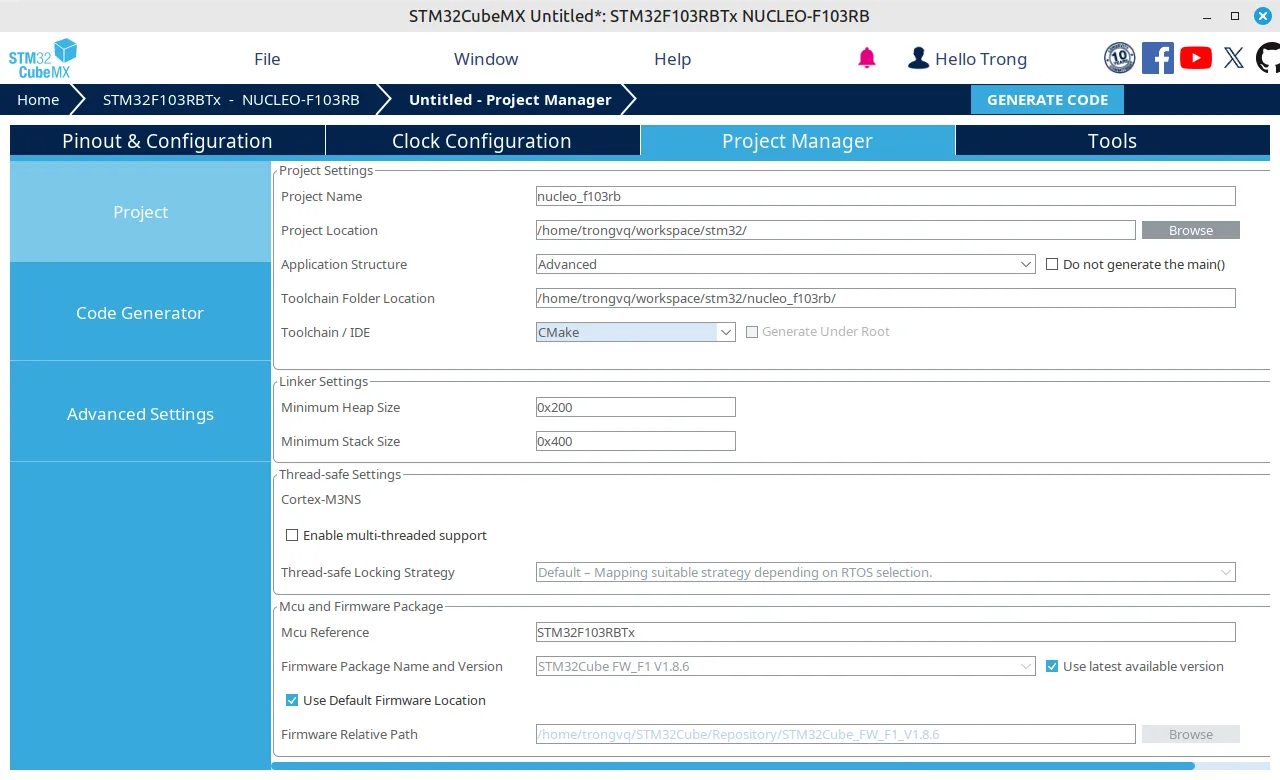
Finally press on GENERATE CODE button.
Create a new git repo with .gitignore file:
git initcat <<EOF >> .gitignorebuildbuild.ninjaCMakeFilesCMakeCache.txtcmake_install.cmakecompile_commands.jsonEOFAdd an init commit with initialized files:
git add *git add .*git commit -m "Init project"Build Project
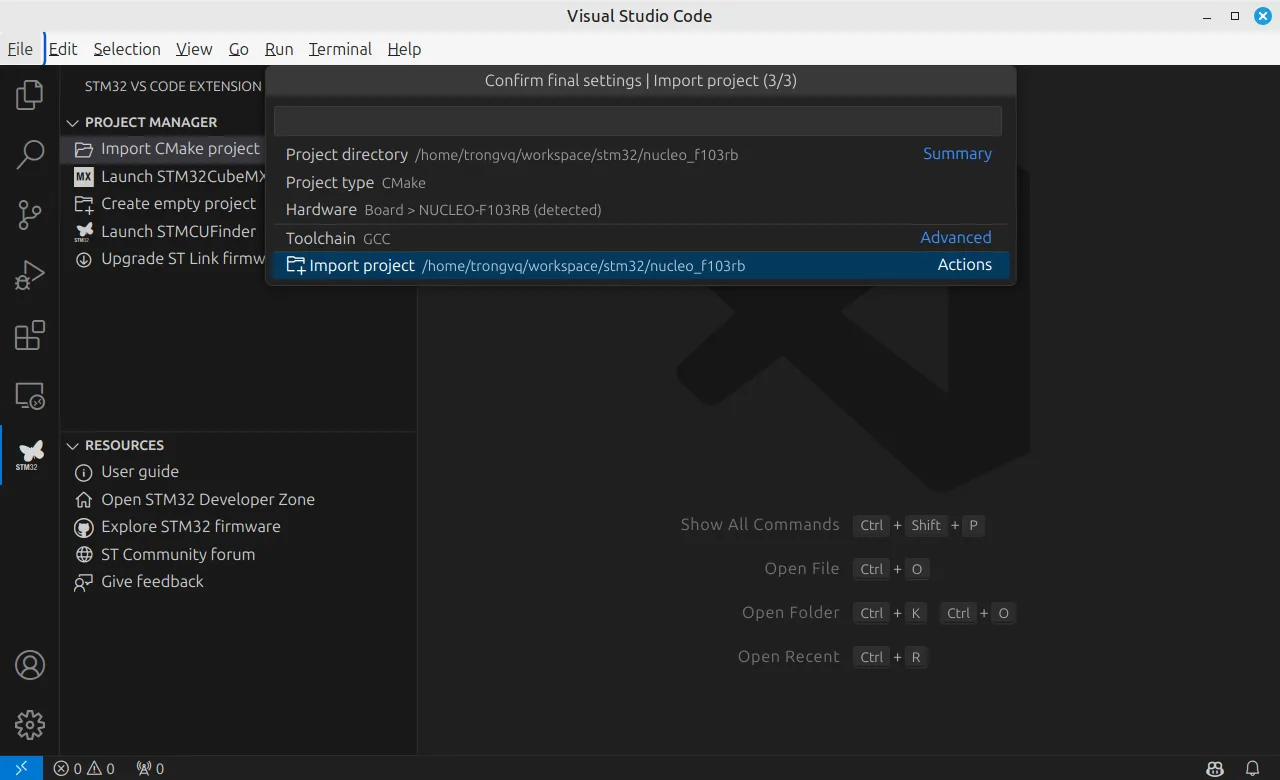
Open CMake Extension to see Configurations and Tasks:
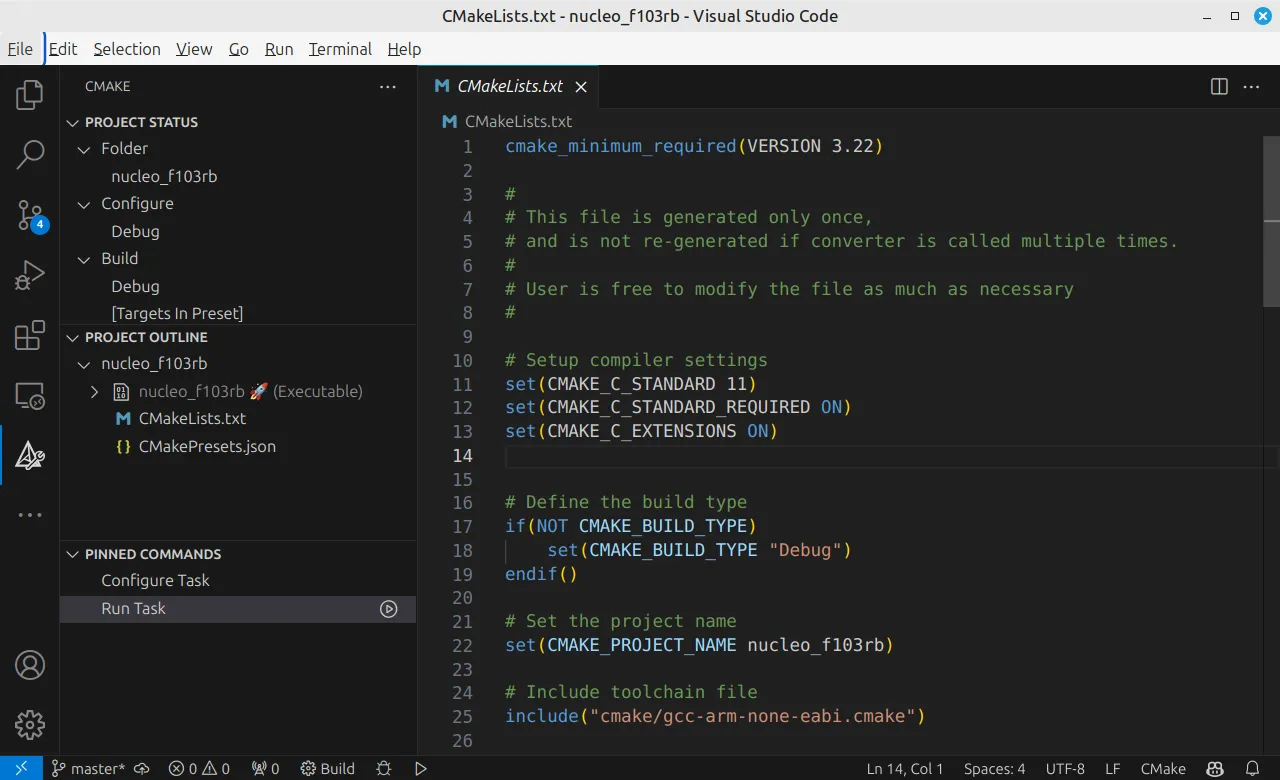
Open Debugger to start a debugging session:
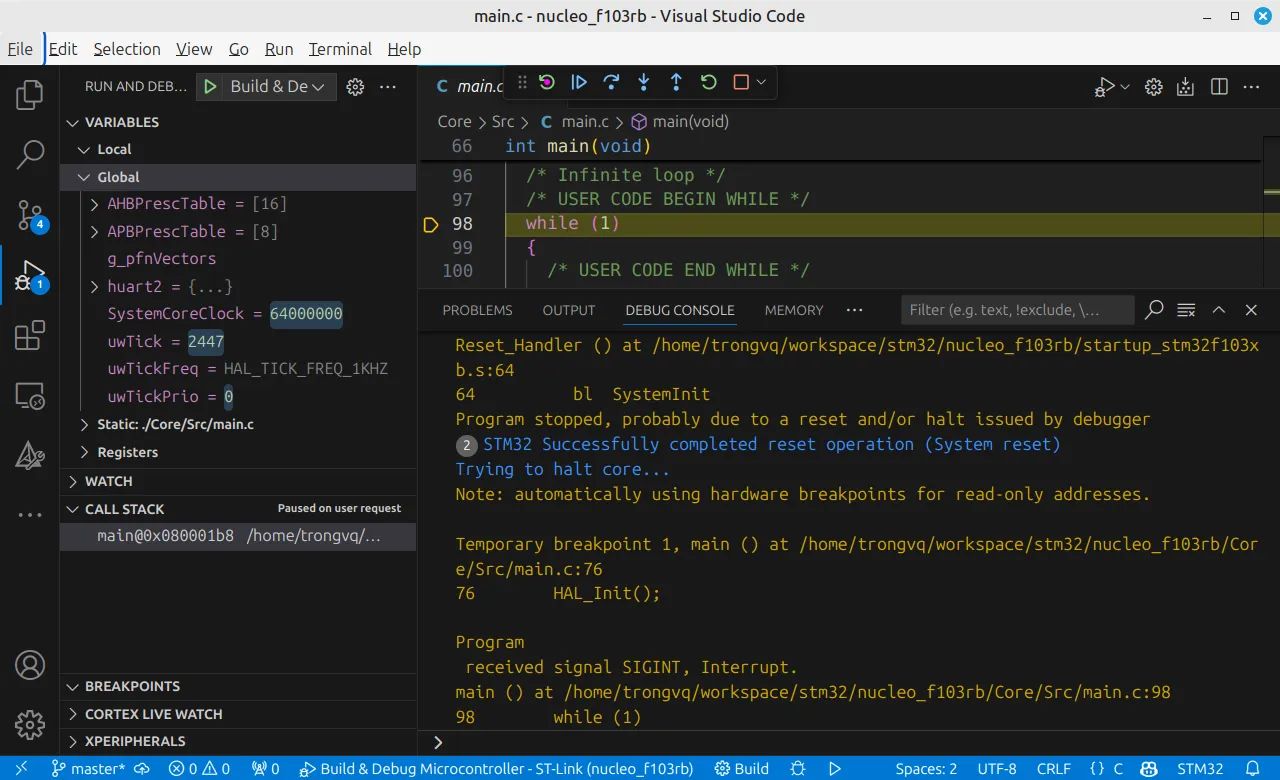
Note that ST’s GDB is built with old libncurses5 which is not available in recent Linux release.
/opt/st/stm32cubeclt_1.16.0/GNU-tools-for-STM32/bin/arm-none-eabi-gdb: error while loading shared libraries: libncurses.so.5: cannot open shared object file: No such file or directoryTo install libncurses5, download the packages and install them manually:
wget http://archive.ubuntu.com/ubuntu/pool/universe/n/ncurses/libtinfo5_6.4-2_amd64.deb && sudo dpkg -i libtinfo5_6.4-2_amd64.debwget http://archive.ubuntu.com/ubuntu/pool/universe/n/ncurses/libncurses5_6.4-2_amd64.deb && sudo dpkg -i libncurses5_6.4-2_amd64.debApplication
It is better to write application on-top of generated code in a separated layer, so that the STM32CubeMX will not actidently deleted application when it re-generates source files.
Create a new folder App, then create files as below structure:
App├── CMakeLists.txt├── Inc│ └── app.h└── Src └── app.cThe header file:
#ifndef __APP_H#define __APP_H
__attribute__((noreturn)) void app_main(void);
#endif // __APP_H
The source file:
#include "app.h"#include "main.h"
__attribute__((noreturn)) void app_main(void) {    while (1) {        HAL_GPIO_TogglePin(LD2_GPIO_Port, LD2_Pin);        HAL_Delay(1000);    }}
Then the CMake file:
cmake_minimum_required(VERSION 3.22)
## Main App#add_library(app STATIC)
# Add include directories as PUBLIC to allow access from other targetstarget_include_directories(app PUBLIC    ${CMAKE_CURRENT_SOURCE_DIR}/Inc)
# Scan for source filesfile(GLOB SRC_FILES    ${CMAKE_CURRENT_SOURCE_DIR}/Src/*.c)
# Add sources to the targettarget_sources(app PRIVATE    ${SRC_FILES})
# refer to stm32 HAL from stm32cubemxtarget_link_libraries(app PRIVATE    stm32cubemx)
Then call the app_main in the main function:
/* USER CODE BEGIN Includes */ #include "app.h"/* USER CODE END Includes */
int main(void) {  ...  /* USER CODE BEGIN 2 */  app_main();  /* USER CODE END 2 */
  /* Infinite loop */  while (1) {  }}
Finally, add the App’s CMake file to the main CMake file:
# Add STM32CubeMX generated sourcesadd_subdirectory(cmake/stm32cubemx)
 # Add Application sources add_subdirectory(App)
# Add linked librariestarget_link_libraries(${CMAKE_PROJECT_NAME}    stm32cubemx
    # Add user defined libraries    app)
FreeRTOS Kernel
Here are stesp to add FreeRTOS into an example project. It’s quite straight forward as FreeRTOS already provides CMake files.
Source files
Download FreeRTOS LST from https://www.freertos.org/, extract it.
Copy FreeRTOS-LTS/FreeRTOS/FreeRTOS-Kernel to App/ThirdParty/FreeRTOS-Kernel.
Configuration
The guide for integrating FreeRTOS Kernel is written in its root CMakeLists.txt:
# User is responsible to one mandatory option:# FREERTOS_PORT, if not specified and native port detected, uses the native compile.## User is responsible for one library target:# freertos_config ,typically an INTERFACE library## User can choose which heap implementation to use (either the implementations# included with FreeRTOS [1..5] or a custom implementation) by providing the# option FREERTOS_HEAP. When dynamic allocation is used, the user must specify a# heap implementation. If the option is not set, the cmake will use no heap# implementation (e.g. when only static allocation is used).So in the App’s CMake file, set the definitions FREERTOS_PORT and FREERTOS_HEAP, create library freertos_config, then call to FreeRTOS-Kernel’s CMake file:
cmake_minimum_required(VERSION 3.22)
 # # FreeRTOS Kernel #
 # select the port for the target MCU set(FREERTOS_PORT GCC_ARM_CM3)
 # select the heap implementation set(FREERTOS_HEAP 4)
 # create the FreeRTOS configuration library add_library(freertos_config INTERFACE)
 target_include_directories(freertos_config INTERFACE     ${CMAKE_CURRENT_SOURCE_DIR}/Inc )
 # add the FreeRTOS Kernel library add_subdirectory(ThirdParty/FreeRTOS-Kernel)
## Main App#...# refer to stm32 HAL from stm32cubemxtarget_link_libraries(app PRIVATE    stm32cubemx    freertos_kernel)
The template header file for FreeRTOS Configuration is located in FreeRTOS-Kernel/examples/template_configuration/FreeRTOSConfig.h.
Either copy the template and change the settings, or create a new one.
Here are must-have configs for creating a config file from zero. Build and fill missing configs into the file.
#ifndef __FREERTOS_CONFIG_H#define __FREERTOS_CONFIG_H
/* HARDWARE */#if defined(__ICCARM__) || defined(__CC_ARM) || defined(__GNUC__)    #include <stdint.h>    extern uint32_t SystemCoreClock;#endif
#define configCPU_CLOCK_HZ              ( SystemCoreClock )#define configTICK_RATE_HZ              ( (TickType_t) 1000 )#define configTICK_TYPE_WIDTH_IN_BITS   ( TICK_TYPE_WIDTH_32_BITS )// #define configUSE_16_BIT_TICKS          ( 0 )
/* SCHEDULER */#define configUSE_PREEMPTION            ( 1 )#define configMINIMAL_STACK_SIZE        ( 512 )#define configTOTAL_HEAP_SIZE           ( 8192 )#define configMAX_PRIORITIES            ( 5 )
/* Cortex-M specific definitions. */#ifdef __NVIC_PRIO_BITS/* __BVIC_PRIO_BITS will be specified when CMSIS is being used. */#define configPRIO_BITS                 ( __NVIC_PRIO_BITS )#else#define configPRIO_BITS                 ( 4 )#endif
/* The lowest interrupt priority that can be used in a call to a "set priority" function. */#define configLIBRARY_LOWEST_INTERRUPT_PRIORITY         ( 15 )
/* The highest interrupt priority that can be used by any interrupt service routine that makes calls to interrupt safe FreeRTOS API functions. DO NOT CALL INTERRUPT SAFE FREERTOS API FUNCTIONS FROM ANY INTERRUPT THAT HAS A HIGHER PRIORITY THAN THIS! (higher priorities are lower numeric values. */#define configLIBRARY_MAX_SYSCALL_INTERRUPT_PRIORITY    ( 5 )
/* This is the value being used as per the ST library which permits 16 priority values, 0 to 15. This must correspond to the configKERNEL_INTERRUPT_PRIORITY setting. Here 15 corresponds to the lowest NVIC value of 255. */#define configLIBRARY_KERNEL_INTERRUPT_PRIORITY         ( 15 )
/* configKERNEL_INTERRUPT_PRIORITY sets the priority of the tick and context switch performing interrupts. Not supported by all FreeRTOS ports.  See https://www.freertos.org/RTOS-Cortex-M3-M4.html for information specific to ARM Cortex-M devices. */#define configKERNEL_INTERRUPT_PRIORITY                 ( configLIBRARY_LOWEST_INTERRUPT_PRIORITY << (8 - configPRIO_BITS) )
/* configMAX_SYSCALL_INTERRUPT_PRIORITY sets the interrupt priority above which FreeRTOS API calls must not be made. Interrupts above this priority are never disabled, so never delayed by RTOS activity. The default value is set to the highest interrupt priority (0). Not supported by all FreeRTOS ports. See https://www.freertos.org/RTOS-Cortex-M3-M4.html for information specific to ARM Cortex-M devices. */#define configMAX_SYSCALL_INTERRUPT_PRIORITY            ( configLIBRARY_MAX_SYSCALL_INTERRUPT_PRIORITY << (8 - configPRIO_BITS) )
#define configUSE_IDLE_HOOK                             ( 0 )#define configUSE_TICK_HOOK                             ( 0 )#define configCHECK_FOR_STACK_OVERFLOW                  ( 0 )
/* LIBRARY */#define configUSE_NEWLIB_REENTRANT      ( 1 )#define configUSE_TIMERS                ( 0 )
#endif // __FREERTOS_CONFIG_H
App Task
App main function now should create an RTOS Task and start the RTOS Kernel:
#include "app.h"#include "main.h"#include <FreeRTOS.h>#include <task.h>
static void Blink_TaskFunction(void *pvParameters) {    UNUSED(pvParameters);    while (1) {        HAL_GPIO_TogglePin(LD2_GPIO_Port, LD2_Pin);        vTaskDelay(100);    }}
__attribute__((noreturn)) void app_main(void) {    xTaskCreate(Blink_TaskFunction, "Blink", 128, NULL, 1, NULL);    vTaskStartScheduler();    // should never reach here    {        taskDISABLE_INTERRUPTS();        for (;;) {        }    }}
When build the project again, an error happens: undefined reference to `vTaskDelay’.
/* METHODS */#define INCLUDE_vTaskDelay ( 1 )At this step, project is able to be built, but app will crash on a Hard Fault Exception.
Interrupt Handlers
STM32CubeMX automatically generates 3 interrupt handlers.
void SVC_Handler(void);void PendSV_Handler(void);void SysTick_Handler(void);However, FreeRTOS also defines those exceptions handlers:
void xPortPendSVHandler( void ) __attribute__( ( naked ) );void xPortSysTickHandler( void );void vPortSVCHandler( void ) __attribute__( ( naked ) );FreeRTOS exception handlers must be called:
-
either directly from Interrupt Vector Table (IVT):
startup_stm32f103xb.s g_pfnVectors:.word _estack.word Reset_Handler.word NMI_Handler.word HardFault_Handler.word MemManage_Handler.word BusFault_Handler.word UsageFault_Handler.word 0.word 0.word 0.word 0.word xPortPendSVHandler /* SVC_Handler */.word DebugMon_Handler.word 0.word vPortSVCHandler /* PendSV_Handler */.word xPortSysTickHandler /* SysTick_Handler */When the
configCHECK_HANDLER_INSTALLATION == 1, FreeRTOS will validate the Direct Installed handlers, if handlers are not in IVT, system will fail on an assertion:received signal SIGINT, Interrupt.xPortStartScheduler () at /home/trongvq/workspace/stm32/nucleo_f103rb/Middlewares/FreeRTOS-Kernel/portable/GCC/ARM_CM3/port.c:300300 configASSERT( pxVectorTable[ portVECTOR_INDEX_SVC ] == vPortSVCHandler ); -
or indirectly called in coresspinding generated handlers:
Core/Src/stm32f1xx_it.c extern void vPortSVCHandler(void);extern void xPortPendSVHandler(void);extern void xPortSysTickHandler(void);void SVC_Handler(void) {vPortSVCHandler();}void PendSV_Handler(void) {xPortPendSVHandler();}void SysTick_Handler(void) {xPortSysTickHandler();HAL_IncTick(); /* must be called when using HAL and share SysTick with HAL */}
Working with STM32CubeMX generated project, it is recommended to reserve SysTick for FreeRTOS and use another Timer for HAL timming functions.
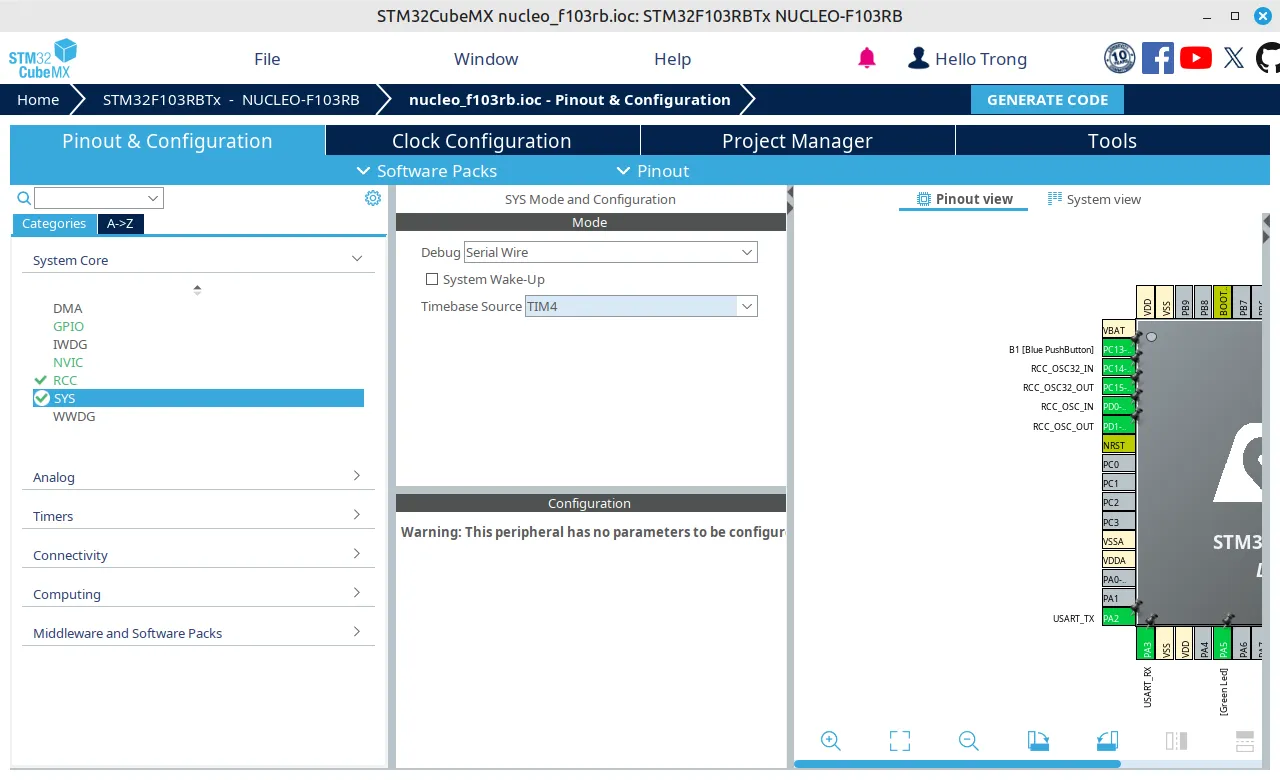
Then tell STM32CubeMX to not generate below interrupt handlers:
SVC_HandlerPendSV_HandlerSysTick_Handler
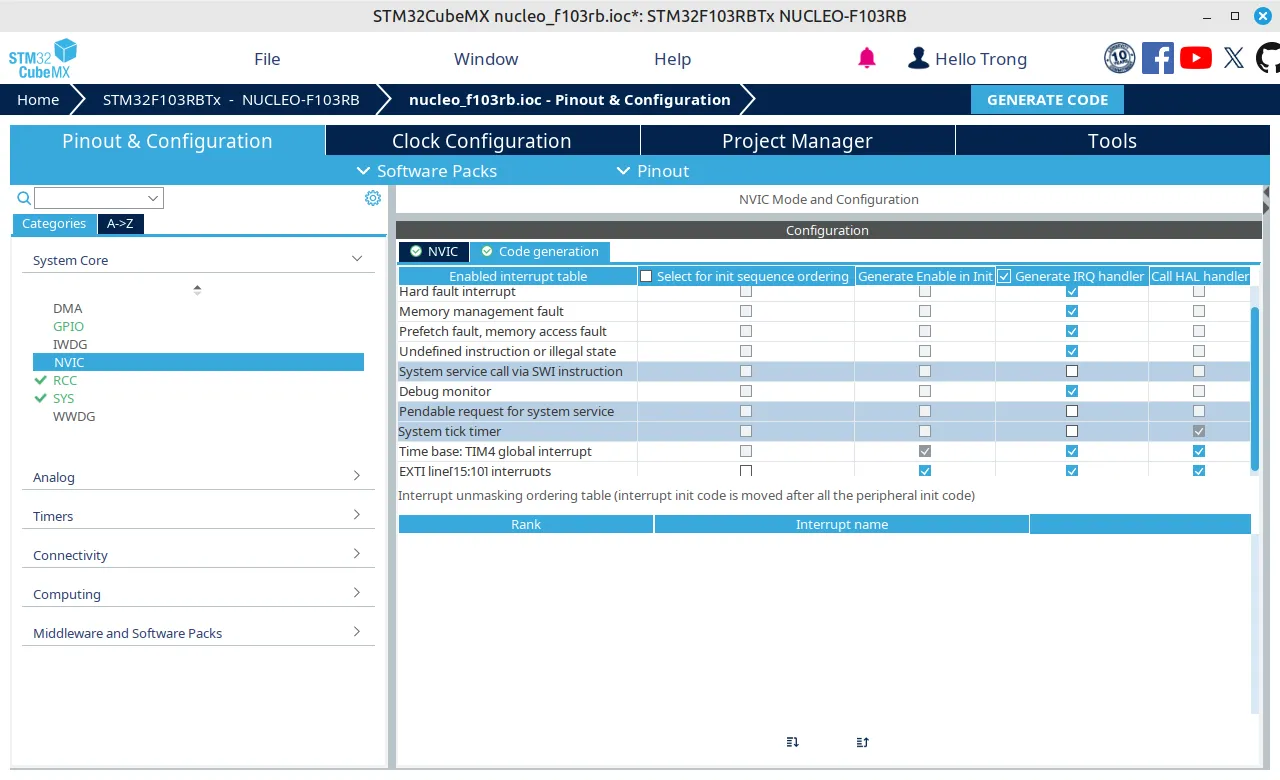
Then map the default handler names to FreeRTOS handlers:
/* INTERRUPT HANDLERS */#define vPortSVCHandler SVC_Handler#define xPortPendSVHandler PendSV_Handler#define xPortSysTickHandler SysTick_HandlerFinally, app can be build and run on the baord.
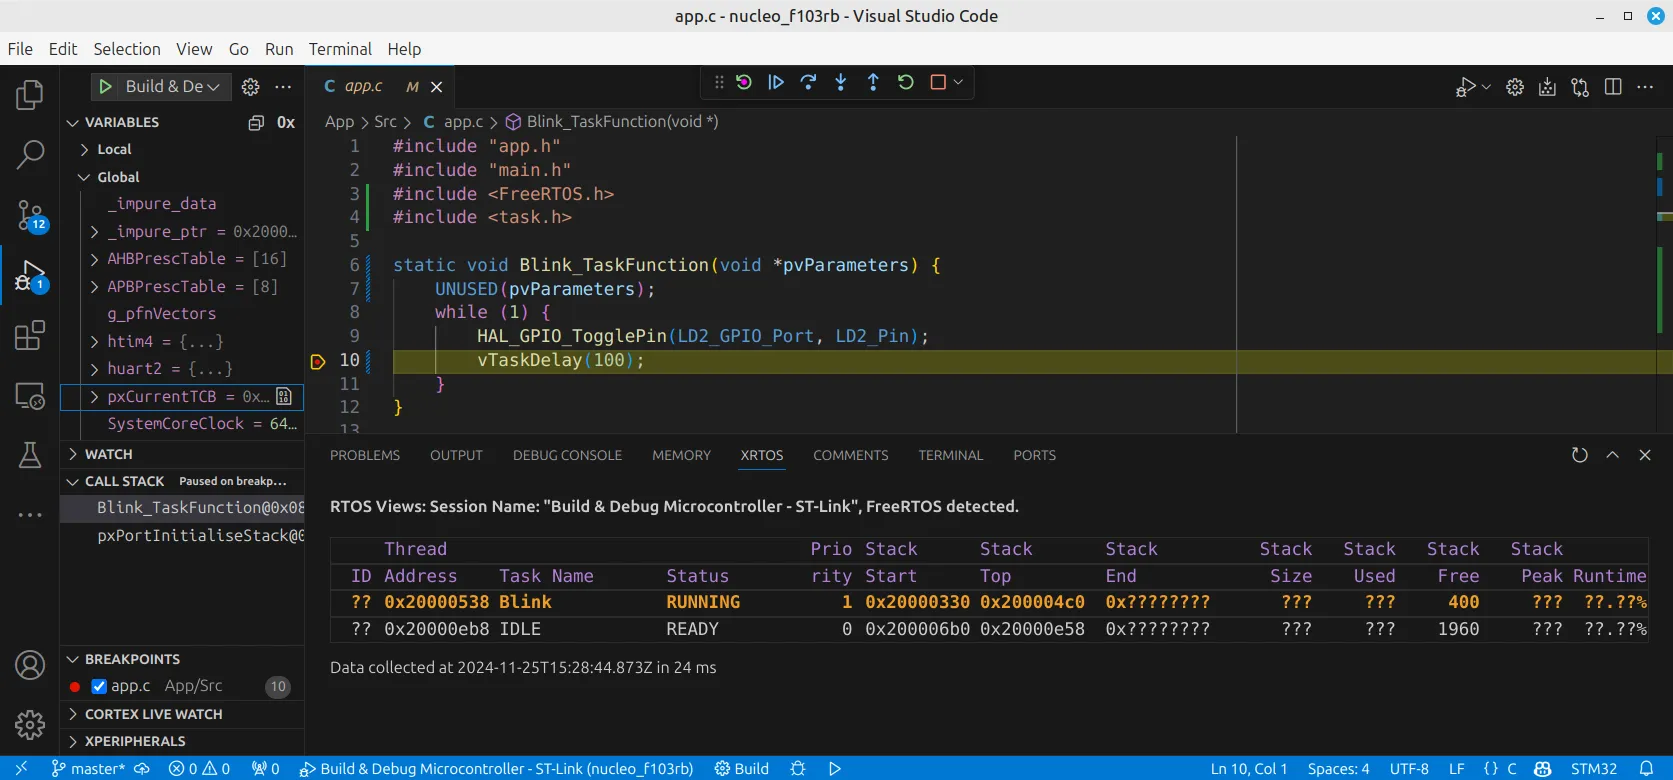
Use Debugger to see FreeRTOS tasks:
It’s good for now!
